Digital Painting Lesson 3: Textures, Part One
/I’m taking a course at Schoolism.com called “Digital Painting with Bobby Chiu.” The courses are usually nine weeks long and they work like this: each week I watch a video of the lesson—usually around 90 minutes in length—and I have until the following week to turn in my assignment. As I am working on the assignment for the next week, Bobby is grading my previous assignment, which involves creating a video of him correcting and drawing over my work, as well as some tips on what I could do better. He posts correction videos a week later, and I’m free to view it as well as those of my 14 other classmates. The lessons are incredible, and I’m learning tricks and techniques I never knew, and I’ve been using Photoshop for years. Also, you just can’t beat the one-on-one attention from such a well-established artist. I highly recommend signing up for a class if you can. It’s worth every penny.
The Lesson
This week’s lesson was the beginning of a two part lecture on textures. One of the things I love about this class is that Bobby takes the time to show us multiple ways of doing things. In this lesson we learned how to paint a black and white image (using similar methods from our first lesson) with a cross hatch texture.
Using a small piece of actual cross hatching that Bobby scanned in, we made a seamless pattern and then duplicated the pattern five times on different layers, each one a different shade. With the sketch as a reference, we painted the picture using one shade at a time and the clone stamp tool. The end result is a picture that looks like it was actually done with cross hatching (especially when printed out), not just a drawing with a texture layer on top set to overlay.
This one was a bit time consuming because you had to click to a different layer every time you wanted to change tones, but it was a method I’m glad I learned. Last week’s lesson he showed us how to make texture brushes, which allow you to achieve similar results quicker, but knowing the “long way” helps, because sometimes it works better.
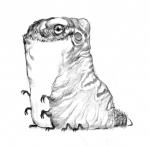
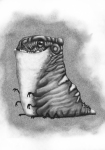
Here is the original sketch from Bobby, and my finished work.


The Critique
This was one of my best assignments, and I really felt good about it. I gave it three stars, because I had some shading issues toward the bottom, losing the creature’s feet a little, but overall I liked it.
Bobby agreed and gave me four stars, saying it was an excellent effort, though there were some minor fixes that needed to be made. First, the whole thing needed to be lightened up a bit. The feet were hard to see because the area around them was too dark. Second, I needed to get rid of the dark outlines on the top of the head and along the back. Bobby has commented on my reliance on outlines multiple times, and it is something I’m trying to break away from. The outlines prevent a painting from looking three dimensional. I wish I could show you the finished product from the critique (it’s in video form), because just adding some lighter tones and ditching the outlines makes a world of difference.
In the next lesson we learned more about textures and how they can make pictures really pop.
