Digital Painting Lesson 5: The Smudge Technique
/The Lesson
This week was all about the smudge tool, that little finger icon over on the toolbar that smears pixels around. I've toyed with the smudge tool before, but I've never found a real practical use for it--turns out, I just wasn't using it right.
Our assignment was to take a line art drawing and transform it into a painting with the smudge tool, with a little help from some brushes in the end. Bobby said that most people don't use the tool alone (at least he doesn't), but he wanted us to in this lesson so that we could get a good feel for it.
Before we started using the tool, we had to get it set the way Bobby uses it. He provided this handy chart for the settings below.
 Smudge tool settings
After that he taught us how the tool works, which is really quite simple. Moving perpendicular between two lines will smudge them together, while moving parallel along a line will soften or blur it. With this basic functionality in mind, we were told to smudge this old man to life.
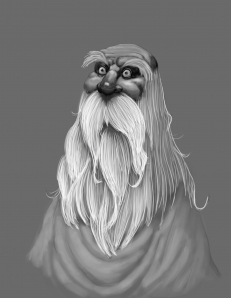
The smudge tool did most of the paint and shading work, but we used brushes for the beard (in the next lesson we made a custom hair brush, but for this lesson it was one hair at a time), some of the cloth in his shirt, and to add some highlights on his face.
Below is our starting picture and what I turned in.


The Critique
I gave myself three stars on this one and so did Bobby. I had to redo the beard because the first time it didn't look like hair, but clumpy pasta. My final image still looks a bit clumpy to me, but it was the best I could do in the time I had. Like lesson three, Bobby pointed out my reliance on outlines as he smudged away the bright white line on the right and some of the lines on his head. He also added more individual hairs and some paint underneath the beard to give it a fuller look.
I have had to constantly remind myself to slow down and not get frustrated in this course. With the exception of the final video, all the lessons are less than two hours. Bobby is a pro and he blazes through these paintings with quick, precise strokes that make digital painting look far easier than it is. By the time I got to this lesson I finally learned to not try and match his pace, but to focus more on matching his technique. This one was great for that because the smudge tool can really mess things up if you're to fast and heavy handed. I took it nice and slow (after the intial pasta beard), and it went much smoother.
The next lesson on custom brushes was even more interesting and very informative. I'll share it with you as soon as I get my critique back.
This week was all about the smudge tool, that little finger icon over on the toolbar that smears pixels around. I've toyed with the smudge tool before, but I've never found a real practical use for it--turns out, I just wasn't using it right.
Our assignment was to take a line art drawing and transform it into a painting with the smudge tool, with a little help from some brushes in the end. Bobby said that most people don't use the tool alone (at least he doesn't), but he wanted us to in this lesson so that we could get a good feel for it.
Before we started using the tool, we had to get it set the way Bobby uses it. He provided this handy chart for the settings below.
 Smudge tool settings
After that he taught us how the tool works, which is really quite simple. Moving perpendicular between two lines will smudge them together, while moving parallel along a line will soften or blur it. With this basic functionality in mind, we were told to smudge this old man to life.
The smudge tool did most of the paint and shading work, but we used brushes for the beard (in the next lesson we made a custom hair brush, but for this lesson it was one hair at a time), some of the cloth in his shirt, and to add some highlights on his face.
Below is our starting picture and what I turned in.


The Critique
I gave myself three stars on this one and so did Bobby. I had to redo the beard because the first time it didn't look like hair, but clumpy pasta. My final image still looks a bit clumpy to me, but it was the best I could do in the time I had. Like lesson three, Bobby pointed out my reliance on outlines as he smudged away the bright white line on the right and some of the lines on his head. He also added more individual hairs and some paint underneath the beard to give it a fuller look.
I have had to constantly remind myself to slow down and not get frustrated in this course. With the exception of the final video, all the lessons are less than two hours. Bobby is a pro and he blazes through these paintings with quick, precise strokes that make digital painting look far easier than it is. By the time I got to this lesson I finally learned to not try and match his pace, but to focus more on matching his technique. This one was great for that because the smudge tool can really mess things up if you're to fast and heavy handed. I took it nice and slow (after the intial pasta beard), and it went much smoother.
The next lesson on custom brushes was even more interesting and very informative. I'll share it with you as soon as I get my critique back.
